This is a bit of an information post I have separated out from a normal blog post because it was a bit boring and looong. But it is useful if you are thinking of going to Norway.
Information is accurate as at August 2025.
Norwegian Toll Roads
There are two types of toll roads in Norway. Public toll roads and Private toll roads. This post is talking about the public type of tolls, operated centrally by the Norwegian government and used to fund road building and maintenance. Private toll roads make their own arrangements and may use an app or other payment mechanism.
When travelling Norway’s roads you will see signs like this:
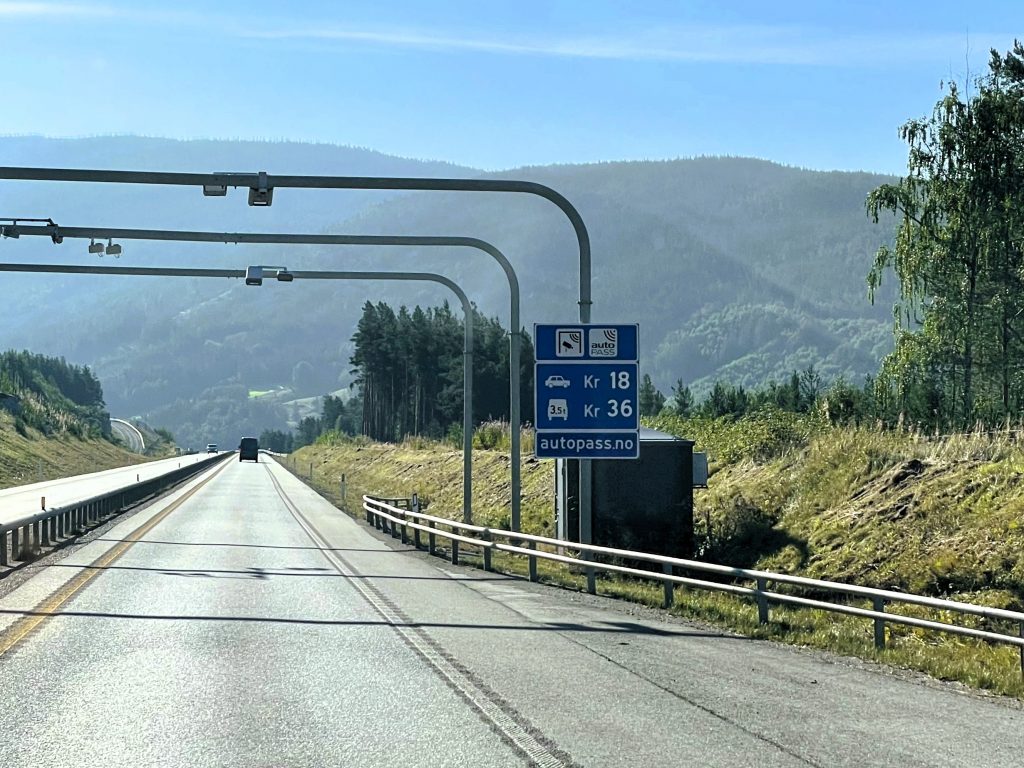
This shows the toll for cars (vehicles 3.5T and under) and heavy vehicles (vehicles over 3.5T).
Shortly after the sign will be a gantry which will us number plate recognition to register that you have used the toll road.
There are no toll booths on Norwegian public toll roads.
Ways to pay for toll roads in Norway
There are three ways in which you can pay for using toll roads, this information can be found here Foreign vehicles | AutoPASS:
- Do nothing
The first thing to note is that you don’t have to do anything special to use Norwegian toll roads. If you do nothing then the Norwegian authorities will take your number plate details and attempt to find you using the UK systems and invoice you at your home address. This may incur an extra charge. I have head anecdotal stories about people being invoiced, and other people never being charged. We understand that data sharing agreements are in place with the DVLA and this has not been impacted by Brexit.
If you have a motorhome over 3.5T it is likely to be charged at the heavy vehicle rate.
Note that if you take this option then you will have to pay full price for any ferries used.
- Register for Epass24
We have not done this so can’t comment on how easy or otherwise it is. If you register for Epass24 then when you drive the toll roads in Norway charges will automatically deducted from your credit card/bank account.
If you have a motorhome over 3.5T (category M1) it should only be charged at the car rate because it is a leisure vehicle. The information you input at registration should allow this to be determined.
Again if you take this option then you will have to pay full price for any ferries used. You also don’t get any discounts on tolls.
- Obtain a toll tag
This is a more involved process but you will get a 20% discount on the tolls. Plus you will be able to register for a discount on ferries (see below). Very useful if you are going to drive up the west coast. There are several toll tag providers, all allow you to claim the 20% discount but some have additional set up and admin fees. A list can be found here Contact a toll service provider | AutoPASS
We chose to use ØresundPay because we may want to drive back over the Øresund and Great Belt bridges and it can be used to set up automatic payment for that route. There were no additional costs for using ØresundPay.
If you have a motorhome over 3.5T and category M1 on the V5 you should be able to register with any of the toll service providers and be charged as a car. As our van is under 3.5T we have not had to do this so cant comment on the complexities or otherwise.
Setting Up a Contract with ØresundPay
Setting up the account online was straightforward using an online form. Our online account was set up and we ordered a Bizz (the physical toll tag aka ‘Brikke’ in Norway) which was sent in the post. For us this arrived a couple of weeks later. The Bizz is sent in a faraday bag to block electronic signals and it is worth keeping hold of this.
When we had received our Bizz we went into our online account and could see the Bizz listed. We then had to add information about the vehicle to the Bizz; Registration Number, Vehicle weight (under/over 3.5T), Emissions Class, Fuel Type. We added our credit card information.
For some reason the online web form didn’t seem to register when we set up our van as under 3.5T. When we contacted the service desk (by email) we were told that it was correctly registered and that there was a problem with the display. .
Important – don’t get charged twice. Once the Bizz had been issued we could see two lines in our accounts. One for the Bizz and one for our vehicle (I think this is because we added our vehicle before the Bizz had been issued). We then deleted the entry for our number plate, I don’t know if this makes any difference however I have heard reports of people being charged twice so it felt prudent to do so.
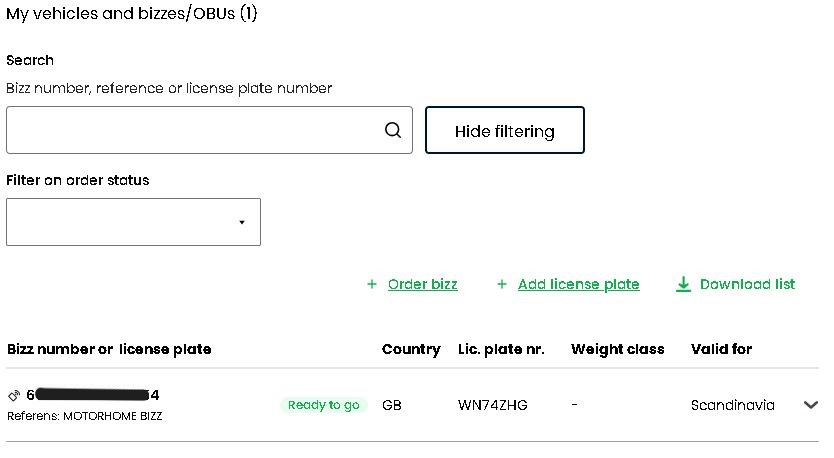
This is the screen where you can see your Bizz details. If you have a separate entry on this screen for your registration number then you may wish to delete it.
Positioning the Toll Tag
The advice from ØresundPay was to place the toll tag behind the rear view mirror. As we don’t have a rear view mirror this was a bit tricky. Following a bit of internet searching we decided to place it in the middle of the windscreen but down a bit lower so it wasn’t in the driver’s direct line of sight. This has worked perfectly for us so far and has been detected correctly on the roads.
The toll tag doesn’t have a display or any switches. It will just work from the outset.
Toll Collection
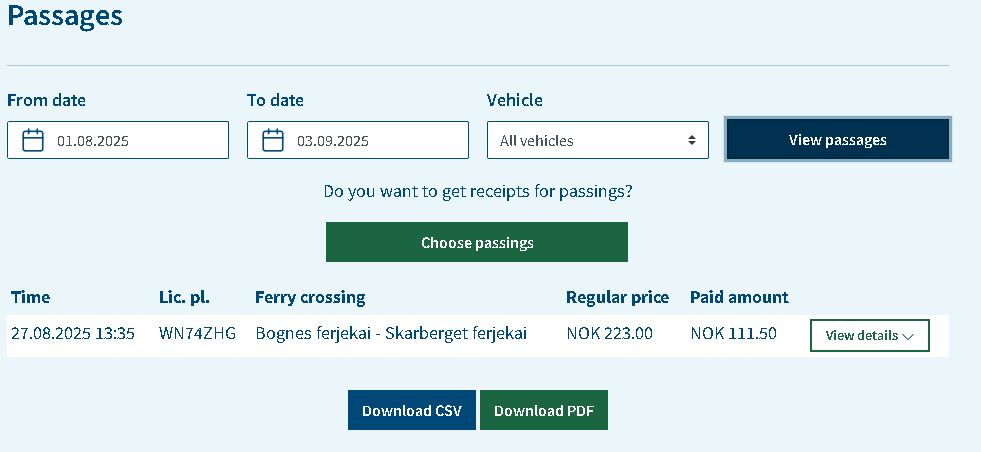
Once you are driving on the Norwegian roads you can log into your ØresundPay account and see the tolls that have been taken. They appeared in the account approximately two hours after passing through the gantries.
We registered our credit card with ØresundPay and in most cases were charged the same day for our tolls. This meant lots of small transactions were created.
Example toll transactions – note that there are several toll gantries on each stretch of road, hence multiple lines with the same ‘Toll Station’
Getting a Ferry Discount
If you have an electronic toll tag you can register with AutoPass for Ferries and get a 50% discount on many car ferries. The ferries that can be used in this wa are listed here Ferry connections – AutoPASS-ferje.
This is well worth doing particularly if you are expecting to do any road trips along the west coast of Norway. However it does require a deposit/pre-payment which increases based on the length of the vehicle.
Applying for an Autopass for Ferries account
Due to some issues with UK mobile numbers it is not possible to set up an account online using the website. We had to use the email ‘contact us’ facility to request for an account to be set up.
In response (about 3 days later, which seemed the usual turn around times for emails) we received an email asking for information, including the phone number, email address (both of which are needed for logging in to your account), vehicle length, and the toll tag number. Note that the toll tag number of an OresundPay Bizz is not the number that Autopass will use when they set up the agreement. Instead they will use the alternative PAN1 number.
The PAN1 number can be downloaded from the OresundPay website following these instructions, however we just provided our Bizz number and Autopass did the conversion.
Paying the Autopass deposit
Once we had sent then information back to Autopass we waited a few days and then received an invoice. The invoice had an IBAN and Swift number which we used to make a foreign account payment. We used our Starling account for this which meant we had a foreign transaction fee of £6.13 on top of the deposit.
We quoted the KID (Customer Id Number) that was provided in the invoice as the payment reference.
We didn’t receive any acknowledgement of the payment, but after a few days I went to the online account and was able to check that the payment had been credited.
Logging into the Autopass Ferje account
To log into this account visit the login page, select the country code from the drop down and enter your phone number (without the leading zero). A password can be created using the link to “Get new password here”. Once logged in you will immediately see you balance in NOK. Note that the online service always seems to issue an error message the first time you log in with a UK phone number. Just try again and it will be recognised.
We updated our account so that we get an email when the ferry cost is deducted from our prepayment amount.
Using Ferries
We have used multiple ferries in Norway. In the majority of instances the staff on the ferry have scanned our toll tag. At one ferry terminal there was a gantry (exactly the same as the toll gantries) which we drove under and registered that we were using the ferry.
When approaching a ferry terminal it is usually pretty obvious which lane you have to be in. Gantries will show the destination harbour and the queues start from left to right and are usually numbered to make it obvious. Ferries where the car deck is enclosed usually expect you to leave your vehicle, but otherwise it is possible to stay in your vehicle for the duration of the journey.
The EnTur app and website are very helpful for ferry timetables. There are several ferry companies and you can also look on the company website for more details.
Ferry Payment if Registered with Autopass for Ferries
We received the email informing us of our crossing the following day. We logged on and could see that the ferry crossing had been registered and that the 50% discount had been applied.
Ferry Payment if not registered
The majority of ferries are now moving to invoicing at your home address in a similar way to tolls, but we did see some where payment was taken by card by the staff.
If you don’t have a toll tag you can also register with FerryPay for payment to be taken automatically from your debit or credit card. Be aware that that you still won’t get the 50% discount.
Ferries that do not use Autopass for Ferries
There are some ferries that do not use autopass. We didn’t use any of these so cannot comment on payment methods.
Pingback: Fjord Scenery on the way to Narvik - Taking the Long Way Home %
Pingback: Mountain Bikes at Hafjell - Taking the Long Way Home %